
Take Flight (in depth)
- wisecrafts

- Jun 20, 2020
- 4 min read

Another day in my journey of digital design and graphic art. Part of this journey includes me stepping outside my comfort zone and doing layouts that aren’t my norm. This was my first attempt at creating a design that tells a story without the use of very many words. I tend to use elements from various designers and I LOVE to use lots of layers. To the naked or untrained eye, one may not see how I could possibly have 40+ layers represented here. So, I ’m going to share how I achieved this look. To make it easy to understand how the layers are arranged, I will be starting from the bottom layer and working up. I will tell you that, outside of my background layer, I don’t usually add background textures/stamps until the very end so I know where to place them around the focal points of the layout.
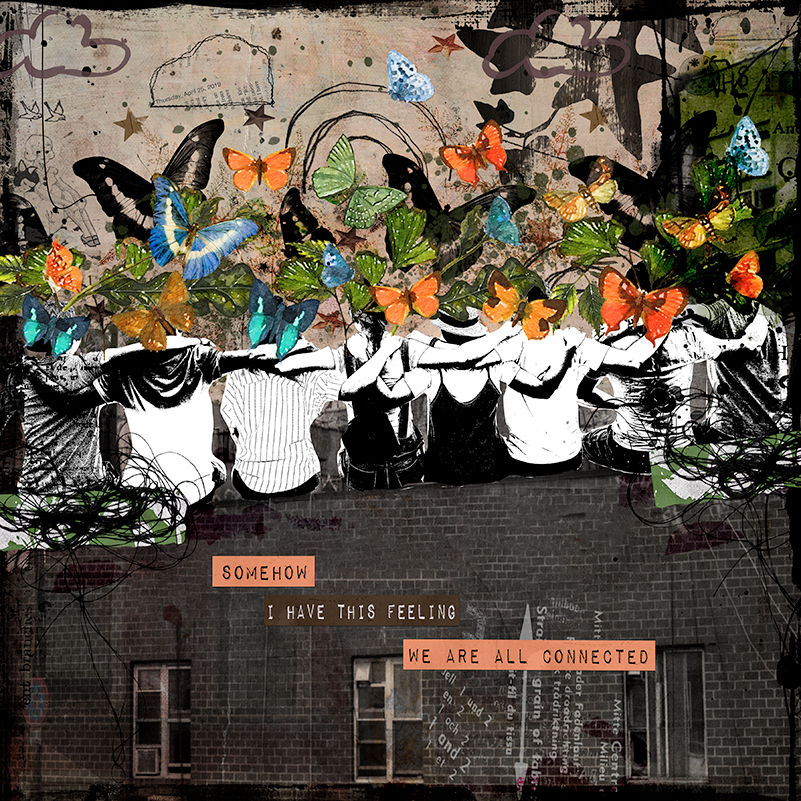
The background paper I used is by Jennifer Fehr-Simple Pleasure Designs. It’s from her kit Beautifully Grunged (pp 06). [Sweet Shoppe Designs]
Layered on top of the background paper, I used the following stamps (Photoshop Brush File) and I modified the colors to match my designs. All these are from the “On the Sunny Side” collection by NBK Designs. [The LilyPad] (paren indicate how many times I used that paint/stamp brush).
These stamps (Photoshop Brush File) were also used on top of the background and from the “Wings Unfolded: Mixed Media Artistry” kit by Rachel Jeffries. [The Lily Pad] (paren indicate how many times I used that paint/stamp brush).
Hearts (x2)
Heartsb (x3)
Markmaking 01 (x1)
Markmaking 02 (x1)
These artsy bit elements from the “Wings Unfolded: Mixed Media Artistry” kit by Rachel Jeffries were also used to complete the background look: (paren indicate how many times I used that artsy bit).
Paint 02b (x1)
Paint 03 (x1)
For the caterpillar look, I used the following elements from the “Wings Unfolded: Mixed Media Artistry” kit by Rachel Jeffries.
Paint 02 artsy bit
Stamps 02 with a black overlay applied
For the flower/branch look that the cocoon is hanging from, I used the following elements:
Brush Mix #25 from “On the Sunny Side” collection by NBK Designs
Fruit twigs x2 from “Wings Unfolded: Mixed Media Artistry” kit by Rachel Jeffries
Flower from “Wings Unfolded: Mixed Media Artistry” kit by Rachel Jeffries
For the cocoon, I used the following elements:
From “Wings Unfolded: Mixed Media Artistry” kit by Rachel Jeffries, I used the
following:
Painted leaves 04
Female sketch (added pink paint for the lips)
Markmaking 04
From “Quiet Insanity” by Synergy Ink [Digital Scrapbooking Studio], I used the following:
Girl (the body in my design is based on this element, I just modified to add the female sketch indicated above to this body).
Once I created the female and placed inside the cocoon, I then positioned the cocoon to look like it’s hanging from the flower stems. I then used the eraser function on the “stamped” brush mix #25 design (the black stamped flower stem) to erase the areas that overlapped into the cocoon.
For young lady who has just emerged from the cocoon, I copy and pasted the female that was used in the cocoon (female sketch & girl body) and enlarged them. I then used “Painted butterfly 01” artsy bit from “Wings Unfolded: Mixed Media Artistry” kit by Rachel Jeffries. I position this butterfly with the body up near the shoulder area and enlarged it enough that when I used the warp function, it would make the wings appear like they are wrapped around the body. I did this for both sides. Once I positioned the wings in a manner that I liked, I then used the eraser function to remove the “body” of the butterfly on each set of wings. I also used the eraser function on the young lady’s hair to erase the butterfly wings that were bleeding through the hair. I wanted the hair to stand out a bit.
To create the young lady with her wings spread I used the following elements from “Wings Unfolded: Mixed Media Artistry” kit by Rachel Jeffries:
Female sketch (added pink paint for the lips)
“Painted butterfly 01” artsy bit
Paper piece 01
Paint 02
Markmaking 04
Stamp 05 (photoshop file NOT the artsy bit)
Female Sketch stamp (photoshop file)
Flower
Flower 3
To create the young lady in flight, I took the female sketch artsy bit and aligned the butterfly on each side of her. I used the perspective and skew functions in photoshop to give the wings a little more dimension. Once the wings were in position, I then used the eraser function on each wing to “erase” the body of the butterfly from them. I also used the eraser function on the female sketch (artsy bit) to remove the wing color bleed through in the hair. Once again, I wanted the hair to have more dimension and not blend into the wings. To the left wing, I layered paint 02 under the wing and overlapping the face and in between the wing area.. I inverted paper piece 01 to give the appearance of a chunky necklace. I placed the “stamp 05” under the right wing and made sure the antenna was extending behind the head. Layered markmaking 04 bit around the right side of the face. I layered the female sketch stamp on top of that, this allowed the young lady to stand out a bit more. Flower 3 was added to the left side of the female and then layered with the flower on top.
For the text strips, I used the following elements:
Text strip 1 from Art Crush No 17 by NBK Designs [The LilyPad]
Wordart 5 & 7 from “Wings Unfolded: Mixed Media Artistry” kit by Rachel Jeffries


Comments